Friday, December 12, 2008

Database Design Final Project

Yesterday, I took my last final exam for my Bachelor's of Science in Computer Science from Utah State University. I have been working at Novell for the last 2 years (that went quickly) and I'm glad they were willing to hire the unlearned me and reimburse my tuition and text book costs for the last bit of my degree. Anyway, that's not what this blog is about...

I finished my "Database Design" final project this Monday. Normally I don't blog about things like this, but I thought this particular case was kind of neat. The project requirements were to provide an application and database that allows the following use case using some provided USGS text-file data (and some other data):
The user searches the database by college/university name or zip code. Then, the database returns the information on the nearest five nearest features for each feature type (e.g., colleges/universities, towns, airports, hospitals, streams, etc.) selected by the user with each feature's name, rank, city, state, zip code, and distance.
I liked the open-endedness of the problem; the only restriction I can think of was that we were restricted to (PostgreSQL, MySQL, or SQL Server).

My idea was to first create a Python command-line interface that prints output to a terminal and optionally writes output in XML, and then create a front-end GUI using PyGTK that executes the CLI program, parses its XML, and displays it in a nice GUI environment.

The point is that I was able to do a major final project for a major university using 100% free open source software. Here is a list of the software that I used and what it was used for. Thanks to everyone who made it possible! Behold the power of open source!
  • mdbtools - to extract some needed data from a Microsoft Access database file
  • PostgreSQL (including psql and pgadmin3) - to store and manage the data
  • PostGIS - support for geographic objects to PostgreSQL
  • openSUSE 11.0 - to operate my system
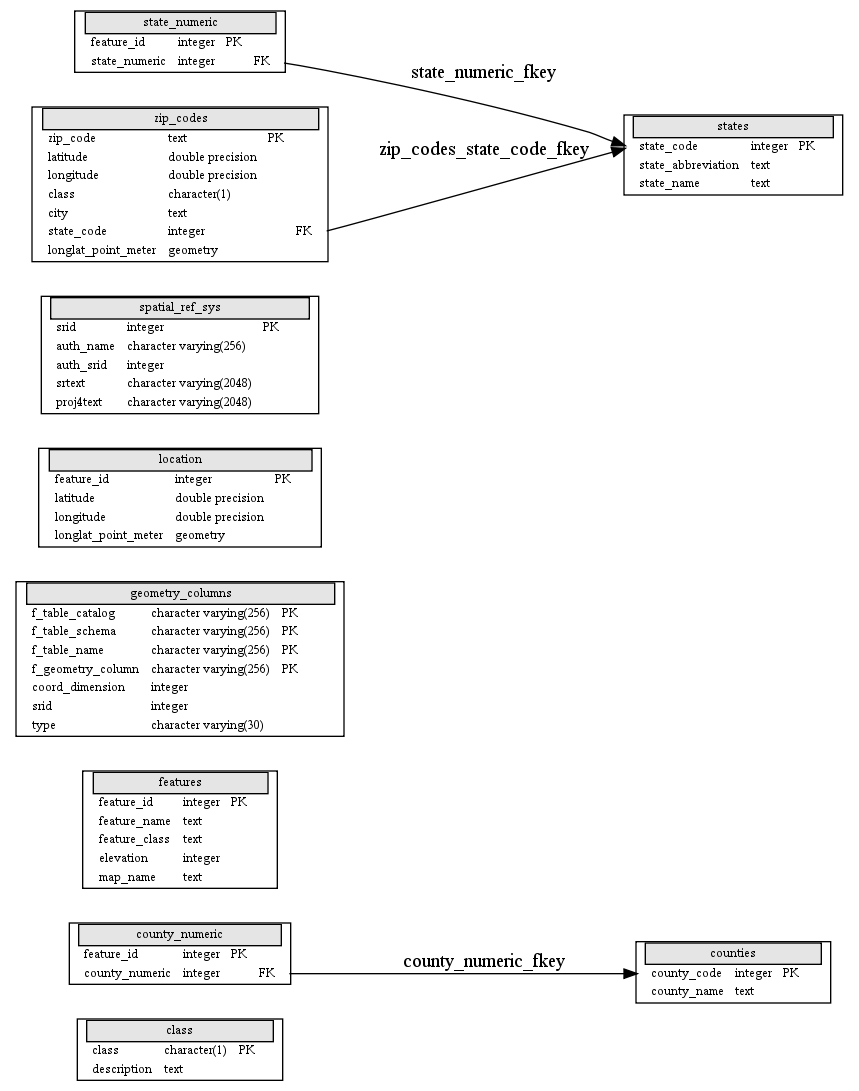
  • PostgreSQL Autodoc - to generate documentation and diagrams for my database
  • OpenOffice - to write my final report and summary.
  • Python - to code
  • Gtk+ and PyGTK - to code the GUI
  • The Gimp - to create a GUI model and take screenshots for my write-up
  • Fluxbox - to manage my windows
  • GNOME - duh!
  • Glade - to design my GUI
  • Firefox - to display my XML using XSLT and CSS
  • PyGreSQL - to interface with Postgres
  • vim - to write the code
  • Evince - to read the assignment
  • Others I'm sure, including all of the GNU core utils we always take for granted ;)
I never had to turn on a Windows machine. I didn't have to port it to Windows or even test it on Windows like I have had to do several times in the past. We were even asked to submit the write-up in OpenOffice format. I'm sure many of you have done this before and I'm happy for you, but having been a Linux user for 11 years now, I am very pleased to see its evolution (in most respects) and its acceptance. The future is definitely open.

Being a Database Design class, the bulk of the work involved getting the appropriate data into the database (I used PostgreSQL), getting the database normalized, adding constraints, etc. This left me with basically two days to hack together the application. With the limited time I had, I didn't quite get the CLI and the GUI as integrated as I would have liked, and there is some weirdness in the GUI code, but that's okay; I was pretty happy with the results:


Here are a couple of other screenshots:
And here's the code and database diagram if anyone cares. It's only useful for educational purposes, because we weren't required to determine which zip code the features are actually *in*, we only had to determined the nearest zipcode centroid to the latitude/longitude point of a feature. This means zip codes, cities, and possibly states can be wrong. The didn't get the GUI as complete as I had hoped, the idea was to parse the XML results and display the actual results in the right pane of the GUI; however, I ran out of time so I simply dumped the path to the XML output file to the GUI instead. I'm sure there are lots of other bugs and hacks, etc. etc. I don't think I normalized the entire database either.

Thursday, August 21, 2008

Nethack on the iPhone

Within the last few weeks several SSH clients have popped up on the App Store. From the looks of things, none of them are really great yet and none of them are free. Regardless, yesterday I finally broke down and purchased one: TouchTerm for $2.99. Anyway, here is a screenshot of me SSHed into my laptop (from an unjailbroken iphone), playing nethack inside of a screen session. Not perfect, but not too bad:


One thing you will want to do is remove the number_pad option from /etc/nethack/nethackrc.tty or ~/.nethackrc (if it's there). This let's you move around in Nethack when your keyboard doesn't have a number pad.

Also, here's a review of the four SSH clients currently (08/22/2008) available at the app store. While the author recommends TouchTerm, I have only skimmed through it; I chose TouchTerm based on the reviews in the app store.

Wednesday, August 13, 2008

Strongwind Basics


ABSTRACT: New introductory Strongwind tutorial called Strongwind Basics.


A big portion of our work on the Mono UI Automation team involves making Mono WinForms applications accessible through AT-SPI. Gtk+ applications are already accessible through AT-SPI, thanks to a bridge that connects AT-SPI and Atk. Screen readers like Orca, and other accessibility tools can then use AT-SPI to access GUI controls (widgets). This allows the accessibility tool to get information from a widget and even perform actions--like clicking a button. Because widgets are made available this way, working with accessibility lends itself extremely well to automated testing.

Several GUI application automation frameworks use AT-SPI to access widgets. For example, LDTP, Dogtail, and Strongwind all access widgets through AT-SPI. On our team, we're using Strongwind to ensure that we're doing a good job of making MonoWinforms applications accessible.

Strongwind is pretty small, simple, and it has some neat logging features. The Strongwind code is located on the GNOME SVN servers and they are the "strongwind" product on GNOME's Bugzilla. The IRC channel is #strongwind on irc.gimp.org.

One small downside is that Strongwind is relatively new; there aren't many users and not much documentation or tutorials. I decided that writing an introductory tutorial would (hopefully) be a good reference for current and future teammates. Hopefully it will be useful to others, too! It's called Strongwind Basics, and I've been writing way too many wikis lately.

On a related note, I made a couple of diagrams for the wikis and for the UTOSC coming up later this month. One diagram is specifically for Strongwind and the other shows how we implemented a harness to run several Strongwind tests on several machines and log the results. Feedback is appreciated, but this is my first real attempt with Inkscape, so don't bust my chops too much :)

pssst, we still have job openings

Friday, July 11, 2008

Building Accerciser from Source (on openSUSE)

I have been using Accerciser for a few months now to aid in my Mono accessibility work, but until now I had been using it in openSUSE 10.3. With the release of openSUSE 11, I had to rebuild it from source. Of course, that meant figuring out all the dependencies again. Since this will happen every time we get a new openSUSE release to test on, I decided to make of note of things this time to reference in the future.

All I did was created a tiny shell script that uses zypper to install the packages that I needed to have in order for Accerciser to configure and compile correctly. Of course, this is openSUSE specific, but it probably useful for other distros (in that you might be able to determine which packages you possibly need):
#!/bin/sh

# accerciser_prep.sh

zypper in gconf2-devel orbit2-devel indent libidl-devel popt-devel glib2-devel pcre-devel libstdc++-devel glib-devel libstdc++43 glibc-devel glib linux-kernel-headers automake autoconf m4 intltool gettext-tools cvs libgomp43 gnome-common gnome-doc-utils-devel libxml-devel ncurses-devel readline-devel tack gcc gcc43 libmudflap43 make zlib-devel IPython
Then just grab Accerciser ( svn co svn+ssh://[login@]svn.gnome.org/svn/accerciser/trunk accerciser ) and run configure, make, and make install! Note that these are the packages that are needed after a default install of openSUSE 11 on my test machines; Accerciser has other requirements, many of which were installed on the OS by default.

By the way, Accerciser 1.34 was released semi-recently (June 16). Accerciser is an interactive Python accessibility explorer for the GNOME desktop. It uses AT-SPI to inspect and control widgets, allowing you to check if an application is providing correct information to assistive technologies and automated test frameworks. I recommend it for anyone involved with accessibility, but also anyone who develops or tests applications! For a good introduction on accessibility and to see how Accerciser can be used, check out Steven Lee's article entitled "Python Powered Accessibility." The article was published recently in Python Magazine;

Friday, June 27, 2008

VMWare (Workstation 6) on openSUSE 11

EDIT July 13th 2008: Thanks to Tony Barnard who pointed me to Cameron Seader's blog entry that has a fix for the vmware-vmblock module problem described in this blog entry.

---

ABSTRACT: ignore the inaccurate gcc version warning and run 'runme.pl' in the vmware-any-any-update117.tar.gz

I ran into a few kinks while installing VMWare on my new openSUSE 11 install. They are fairly minor, but here's some info that should get you up and running.

First of all, the vmware-config.pl script told me that it couldn't find a suitable vmmon module for my kernel. No problem, that's normal, the script will just compile one for me like always correct? Well, correct for the most part; after affirming that I wanted the script to try and build the vmmodule, I got the following message:

Your kernel was built with "gcc" version "4.3.1", while you are trying to use
"/usr/bin/gcc" version "4.3". This configuration is not recommended and VMware
Workstation may crash if you'll continue. Please try to use exactly same
compiler as one used for building your kernel. Do you want to go with compiler
"/usr/bin/gcc" version "4.3" anyway? [no]
I found this message a little odd and unsettling since I had just installed the system and hadn't messed with updates yet. I decided to investigate whether the script was even telling me the truth or not.
bean@cobweb:~> gcc --version
gcc (SUSE Linux) 4.3.1 20080507 (prerelease) [gcc-4_3-branch revision 135036]
The version looked right to me and I wondered where vmware-config.pl was getting its information. After browsing the gcc manual, I found the -dumpversion option and tried it out...

bean@cobweb:~> gcc -dumpversion
4.3
This appeared to be the problem. Sure enough, line 3266 of vmware-config.pl runs gcc with the -dumpversion option. So this really wasn't anything to be worried about, while it is apparently a gcc bug, it's safe to just respond "yes" to the prompt.

I didn't get very far after that, however. The vmmon module fails to build almost immediately. Coincidentally, a weak or so earlier I had been installing VMware on a Slackware machine and had learned about the vmware-any-any-update patches. These are unsupported and apparently third-party updates for vmware. The newest update I found was vmware-any-any-update117.tar.gz. I download it and ran the 'runme.pl' script, which updates the source of the modules.

So after ignoring the inaccurate gcc version warning and running the vmware-any-any-update117.tar.gz, I now have a running (and unsupported :)) VMware setup.

As a side note I didn't find that some of the vmware-any-any-update files claimed to be 117, but were really no different than the 115 versions. I'm not sure what's up with that, but it threw me off for a while. I uploaded the good one I found. Also, the vmblock module still fails to build, it would be nice to find a fix for this.


Thursday, April 10, 2008

Cute 'lil laptop

I just noticed the new HP 2133 Mini-Note PC is available on on HP's site. It looks pretty neat. Basically it's a mini-laptop with a 8.9-inch diagonal WXGA (1280 x 800 resolution) screen and a "92% full-size" keyboard. Additionally, it has an external VGA port that supports resolutions up to 2048 x 1536 at 75 Hz. The thing weighs 2.8 lbs. It has a VIA C7-M processor (1.0, 1.2, or 1.6 Ghz options). The coolest part is that is ships with Windows Vista (boo!) or SUSE Linux Enterprise Desktop (SLED) 10 installed (yay!). Ordering it with SLED10 will save you $50. Here's a picture:


Oh, and they won't ship the 1.0 Ghz version with Vista. I wonder why? [ 1 | 2 ]

Pretty cool device at a reasonable price; just for fun, I configured a 1.2 Ghz model with SLED10 and 2GB of RAM for $618. Pricing starts at $499. Here are the detailed specs.

I don't know if it's as cool as Sony's VAIO UX, but it sure is a lot cheaper and probably quite a bit more practical for most people.

Wednesday, April 9, 2008

Building accerciser from source

EDIT July 22nd 2008: This post is outdated. See http://bgmerrell.blogspot.com/2008/07/buildling-accerciser-from-source-on.html.

---

To get Accerciser working with all default plugins, do the following:

Manually download pygtksourceview src from sourceforge and build it.

Install all requirements from Accerciser page plus:

Additionally, make sure the following are installed:
  • autoconf
  • intltool
  • automake
  • gtksourceview185 (version 2 won't work here)
  • gnome-doc
  • gnome-common
  • get all the associated devel packages just to be sure
  • and maybe some others...

Monday, April 7, 2008

Mono UIAutomation Team: Getting Specific

I have been spending most of my time until now getting to know more about Accerciser and AT-SPI (see this previous post for more information on those). As a byproduct of studying and working with the Accerciser code, I have also been able to work quite a bit more familiar with GTK+, which has been nice.

Sandy, Knocte, and Mike Gorse have all been pumping out some code for the project the last few weeks. We also interviewed a candidate for the team last week. At the end of the week, I recognized that I better get a clear vision of our project and goals so I could assess the work that would need to be done from a QA perspective and perhaps start working on some relevant tools, patches, or scripts.

In addition to what I had learned from the Python Powered Accessibility article (I recommend reading it before you go on if you haven't already done so), this is what I knew about the project:


Granted, this might mean a lot for someone who had worked with accessibility in Linux before, but it didn't mean a whole lot to me. Not enough to have a clear vision, anyway. I wanted to get a really clear picture, so first I turned to Wikipedia and the MSDN documentation to get some fundamental knowledge and came up with the following definitions:

Managed Code - executes under the management of Microsoft's CLR virtual machine in the .NET framework, or another similar virtual machine.

CLR - common language runtime, virtual machine component of Microsoft's .NET initiative. The CLR runs a form of bytecode called CIL (common intermediate language).

CIL - previously known as MSIL. Stack-based object-oriented assembly language executed by a virtual machine (e.g., CLR)

Unmanaged Code - executed directly by the computer's CPU. The programming language used to create the program determines whether it will run as managed code or not. C and C++ are examples of unmanaged code.

CLI - Microsoft's open specification describes the executable code and runtime environment that form the core of a number of runtimes including the Microsoft's .NET framework, Mono, and Portable.NET

Microsoft UI Automation - a managed code application programming interface (API), exposing user interface controls for test automation and assistive technology. Part of the .NET framework starting at 3.0. Successor of MSAA (Microsoft Active Accessibility)

UIA Clients - applications such as screen readers and testing frameworks written in managed code (e.g., C#/VB).

UIA Providers - UI implementations or application controls such as checkboxes. Written in managed code or C/C++ (unmanaged code).

Olive - set of add-on libraries for the Mono core that bring some new .NET APIs to Mono.

UIA Core - the UIA core masks any differences in the frameworks that underlie various pieces of the UI. For example, the content property of a WPF button, the caption property of a Win32 button, and ALT property of an HTML image are mapped to a single property.

AT - assistive technology. A generic term that includes assistive, adaptive, and rehabilitative devices and the process used in selecting, locating, and using them.

AT-SPI - a toolkit neutral way of providing accessibility facilities in applications. AT-SPI can also be used toa tuomated testing of user interfaces. AT-SPI is currently supported by GTK+2, JAVA/Swing, Mozilla, and StarOffice/OpenOffice. AT-SPI will act as the equivalent of the UIA core.

ATK - accessibility tookit. Developer toolkit that allows programmers to use common GNOME accessibility features in their applications.

ATK<->UIA Bridge - mapping of ATK to the UIA provider APIs.

A lot of these definitions weren't new to me, but it's nice having them all in one place. They didn't exactly answer my questions, but they provided me with enough background to ask some (at least somewhat) intelligent questions, so I took my inquisition to Sandy on IRC:

bgmerrell: from msdn "The UI Automation core masks any differences in the frameworks that underlie various pieces of UI. For example, the Content property of a WPF button, the Caption property of a Win32 button, and the ALT property of an HTML image are all mapped to a single property"
bgmerrell: so i assume we're going to have to do this masking for gtk widgets too, right?
sandy: basically, that's the idea with us implementing providers
sandy: has Calvin shown you his drawing of the client and provider sides?
bgmerrell: this thing? http://www.mono-project.com/files/3/37/Architecture.png
sandy: yeah!
sandy: so here's the deal
sandy: on the provider side, we are using the interfaces defined in UIA to map Winforms and Moonlight to UIA, and then we're mapping UIA to ATK
sandy: then on the client side, we're going to map the UIA client interfaces directly to at-spi
sandy: so we don't do anything with gtk
sandy: because the stack is already implemented there
sandy: gtk apps will show up over at-spi
sandy: and our client-side bridge will let us see them via the UIA client interfaces
sandy: UIA has their "core"
sandy: but we already have the equivalent of that
sandy: it's at-spi
bgmerrell: okay that makes sense. so, at-spi is currently supported by "GTK+ 2, Java/Swing, the Mozilla suite, and StarOffice/OpenOffice.org, and some QT support"
bgmerrell: so theoretically we will be able to control/access any of those to some degree?
sandy: that's right
bgmerrell: sandy: do you have any ideas on what we should do from a QA perspective to test the provider piece? Or do you think we're mostly going to be testing the provider via the client?
sandy: I think testing via accerciser and orca makes the most sense
sandy: for QA purposes
bgmerrell: okay, maybe i'm confused. on the provider side you don't really have an accessible UI because that's implemented on the client side isn't it?
bgmerrell: but you guys are talking about working with Accerciser, so accerciser must see something that's accessible
sandy: yes
sandy: so on the provider side
sandy: we are making winforms apps visible over at-spi
sandy: so existing ATs like Accerciser will be able to see our apps and interact with them
sandy: so I think the end-goal of this year is to make is so you can use existing Linux ATs to access winforms apps
sandy: if I understand correctly
sandy: so then I guess the best QA approach would be to test how well we achieve that goal
sandy: perhaps by writing accerciser or dogtail or whatever scripts that test interaction with winforms apps?
bgmerrell: "so existing ATs like Accerciser will be able to see our apps"
bgmerrell: how does that contrast to what we'll be doing on the client side?
sandy: so once we start working on the client side...
sandy: the goal is that we can write new ATs
sandy: or port new ATs from Windows
sandy: written using the UIA client interfaces
bgmerrell: instead of directly using at-spi?
sandy: then those ATs will be able to see all of the Linux apps that are exposed over at-spi, including gtk, winforms, qt, oo.o, mozilla, etc
sandy: bgmerrell: exactly

So now when I looked at the architecture image, things made a lot more sense.

Blue and green items are existing implementations, beige shows items that our team will implement, and I hope to work on a managed AT next year.

This information made things more things a lot more clear for me, and hopefully will help others that are new to the project and/or accessibility. If there is something that is unclear, please let me know; I would like this to be clear enough that anyone interested in working on the project can have a good fundamental understanding of what we're doing.


Saturday, April 5, 2008

Broadband in the U.S.A.

Below is a video clip of Walter Mossberg, the principal technology columnist for the Wall Street Journal. He talks about the present state (i.e., crappy state) of broadband in the U.S. I think he make some really good points.


One example of overpriced DSL with ridiculous service (and security) is from the rural Utah city from which I moved in 2006, behold:

DSL Pricing

$39/month: up 1.5 M
$49/month: up to 3 M
$59/month: up to 6 M

It surprised me to see that their lowest DSL plan wasn't 256k anymore! I'm sure there are some even better examples out there, I just have dealt with this one personally.

My current situation isn't really any better, the ISP is the city in which I live. I pay $28 ($35 if I didn't get cable TV from them) and I get about 1mbps-3mbps. They don't even advertise their bandwidth. This is frustrating because 15 miles north of here and 10 miles south of here, both cities have Utopia, which offers 100 mbps upload and download for a reasonable price (someone remind me how it costs).

Mossberg makes a good point. We need to be putting as much emphasis on our broadband infrastructure as we are on our roads and freeways. If the U.S. is to keep up technologically with other high-tech countries (think economic repercussions if we don't), we need to be investing in broadband that helps us stay competitive in the global economy.

For all of the iPhone fans out there, toward the end of the video Mossberg also foretells the availability of the 3g iPhone in 60 days.

Friday, March 28, 2008

Ubuntu's GDM resolution way too high!

Another little quirk I ran into while installing my VMs (mentioned below)... When setting up VMs for people to share, I like to use an 800x600 resolution. That way, no matter who fires up the vm, they can usually see the entire screen of the VM and configure the resolution (and anything else) however they want.

So, I'm installing Ubuntu 7.10 (whatever wacky name they have for it), and during the installation I set the resolution to 800x600. However, when the install finishes and I reboot the machine, GDM loads in some resolution way too big for my 1400x900 laptop. To fix the problem I just removed the 'Virtual 1400 1050' line in /etc/X11/xorg.conf. It was the only Virtual subsection in xorg.conf.

Seems like Virtual is doing something it's not supposed to here...

Virtual Machines: 64-bit guest on 32-bit host

I have been installing some Ubuntu, Fedora, and openSUSE vms in preparation for testing the accessibility/UIAutomation stuff. I wanted to prepare some 64-bit VMs on my ThinkPad T61 Centrino Duo laptop (64-bit hardware) with 32-bit openSUSE installed.

I figured it would be a problem since I had 64-bit hardware. It was once I figured out that the Intel(R) Virtualization Technology--that is needed to do it--is disabled in the BIOS by default. I enabled the setting under Config -> CPU, and voilĂ !

Thursday, March 13, 2008

Comparison: C#, IronPython, and Boo

Over the last few days I have been using and comparing a few of the different Mono related languages that are out there, namely C#, IronPython, and Boo. After working in each one, I thought it might be helpful to have some sort of reference for people who want to quickly learn more about using .NET on Linux, people who want to quickly compare some of the basic differences in the languages, or for people who are just learning to program. With that in mind, I put together a little crash course on some of the basics of each language, enjoy: http://bean.wikidot.com/comparecsharpironpythonboo.

As a side note, I thought wikidot was a pretty neat service.

Wednesday, February 20, 2008

Great Introduction to Accessibility

Having recently joined an accessibility team (focusing on Mono the Linux desktop), I have been scouring the internets learning more about accessibility in general. My main focus has been: 1) what accessibility resources are currently available for developers 2) what are the accessibility needs of persons who are disabled and what resources are currently available to them.

I just finished reading a very enlightening article written by Steven Lee entitled "Python Powered Accessibility." The article was published recently in Python Magazine; however, the article isn't really about Python at all (although it does contain a brief tutorial on the python application Accerciser). Steve does a great job explaining, at a high level, what resources are available to developers. He also explains different types of disabilities, and what individuals with those disabilities might need from their accessibility applications. Additionally, he provides several examples of accessibility tools for the Linux desktop. He also talks about how to get involved in accessibility, and suggests that it is a good introduction to contributing to Open Source projects.

Apropos, I will make a shameless plug for the accessibility team I am a part of, and encourage people to get involved.

One of the neatest applications (in my opinion) mentioned in the article is Dasher. There's a neat Google Tech Talk on Dasher that can be found on YouTube (http://youtube.com/watch?v=wpOxbesRNBc). It's long, but worth the time.

Saturday, February 16, 2008

Hackergotchi


I spent the a couple of minutes on the last day hack week creating a hackergotchi. Now I can replace my Novell mugshot. No, I don't usually have such a glorious chin beard (or one at all), I just thought it might spice up my floating head a little bit. In fact, the beard was kind of an experiment over the holiday season to see how long my wife would live with it. I made it to January 15th.

Friday, February 15, 2008

Tasky! (Hack Week 2 Project)

This week, Calvin, Boyd, Sandy, Myself and some others have been working on a new project called Tasky. Tasky is a task management system, written in Mono, for the Gnome desktop. Tasky is a small and easy-to-use application that docks in your taskbar (much like Tomboy notes) and synchronizes with Remember the Milk (an online task management page). It has been a ton of fun to work on, and it was amazing to see the results of a week of nonstop hacking of just a few guys. Everyone on the team has been great to work with, and it was a great opportunity to get to know the guys on the Linux Desktop team. Boyd rolled a release last night and it's in the GNOME:Community BuildService (found under "Community Repositories in YaST), so you should be able to grab it and take it for a spin! Also, check out the screenshots.

Wednesday, February 6, 2008

SLES10-sp1 hangs during installation in VMware?

I recently installed three SLES10-sp1 64-bit virtual machines in VMware. The install went just fine until the very last step (the configuring devices screen I think it's called). Upon reaching this screen my screen would go completely black and stay that way--I even left it black for an entire weekend.

The solution is to simple go through the entire install as you normally would. When the screen goes black, swith to an alternate console (press CTRL+ALT+F2 for example). If this doesn't switch consoles, reboot the machine, wait for the install wizard to come back up and then switch to a different console.

Once you have a new console just remove the /var/lib/YaST2/runme_at_boot file, which is the file that loads the installation wizard when you reboot, then reboot again.

The installation step you miss is where you would set your monitor, 3D acceleration, and screen resolution. So, once you have rebooted simply run 'sax2' as root to configure the stuff you missed.

Fixing the root user's ls command to not show hidden files

Hidden files in Linux are preceded by a dot. For example, a user's home directory is usually full of hidden directories like .ssh, .mozilla, .gnome, and many more.

One really annoying thing that is unique to SUSE (as far as I know), is the fact that the ls command, when run as root, shows hidden files by default. This "feature," exists because of the alias ls='ls $LS_OPTIONS'. In /etc/bash.bashrc you will see the following snippet of code:


if test "$UID" = 0 ; then
LS_OPTIONS="-A -N $LS_OPTIONS -T 0"
else
LS_OPTIONS="-N $LS_OPTIONS -T 0"
fi

The $UID variable has been set to equal the user ID (UID). For root the UID is 0. According to the above code, if "ls" is typed as root, the command that actually gets executed is "ls -A -N $LS_OPTIONS -T 0."

Simply removing the "-A" from the code snippet above (found in /etc/bash.bashrc) will make it so hidden files are not displayed when the root user runs the ls command.

NetBeans IDE with jVi plugin

My last post dealt with using the vim taglist plugin. This plugin provides an overview of the structure of source code files and allows you to efficiently browse through source code files in different programming languages. One could say that the taglist plugin makes vim "feel more like an ide."

Today, I would like to discuss a method to use a vim-like editor inside of an IDE--that is, to make an IDE feel more like vim. There are several IDEs available. When I began searching for an acceptable IDE I had two criteria. First, the IDE must be free. Second, the IDE must have vim emulation.

The NetBeans IDE was the only IDE that I found that met my criteria. I thought it was pretty smooth for the most part. I have not tested it much, but the vim emulation was good. I did run into some issues when working with a maven2 project.

NetBeans can be downloaded from http://www.netbeans.org. The jVi plugin can be downloaded from
http://jvi.sourceforge.net and consists of a zip file that contains two .nbm (NetBeans Module) files. The jVi plugin is a port of a large portion vim, not just a set of keybindings. If the plugin doesn't work like vim then it's a bug. After downloading and installing the NetBeans IDE and downloading and unzipping the jVi plugin, the plugin can be installed in the following manner:

  1. Open NetBeans and browse to Tools -> Plugins
  2. Click the "Downloaded" tab
  3. Click the "Add Plugins..." button
  4. Browse to jVi directory that contains the .nbm files
  5. Select both .nbm files and click "Open"
  6. Make sure "jVi KeyBindings" and "jVi Core" are both selected for installation and click "Install"
  7. Proceed through the plugin installation wizard."

    The jVi plugin will be activated automatically. You can disable it by un-checking jVi in the "Tools" menu. Here is a screenshot of NetBeans with the jVi plugin installed:

    NetBeans IDE with JvI plugin

    P.S.

    I ran into a problem trying to run NetBeans on openSUSE 10.3:

    bean@cobweb:~/netbeans-6.0beta1/bin> ./netbeans
    java: xcb_xlib.c:52: xcb_xlib_unlock: Assertion `c->xlib.lock' failed.
    (truncated)

    To fix this problem, I had to set the following environment variable:

    export LIBXCB_ALLOW_SLOPPY_LOCK=1

    This is due to bug 252510

vim with the taglist plugin and exuberant ctags

First of all, let me introduce Ctags and the Taglist plugin:

Ctags generates an index (or tag) file of language objects found in source files that allows these items to be quickly and easily located by a text editor or other utility. A tag signifies a language object for which an index entry is available (or, alternatively, the index entry created for that object).

The "Tag List" plugin is a source code browser plugin for Vim. This plugin
allows you to efficiently browse through source code files for different
programming languages

Ctags must be installed in order for you to use the taglist plugin. Once you have installed ctags and the taglist plugin, some fantastic features in vim are
available to you. In short, the taglist plugin allows you to open a "side bar" inside of vim; this side bar is similar to the side bar in popular IDEs (e.g., eclipse, MS visual studio) and enables you to browse files and source code. For example, when a file is selected in the side bar, that file will be opened in the main window. Similarly, when a function or method is selected in the side bar, the main window will jump to that function or method. Ctags also enables you to jump from a symbol/function call/variable to its definition.

Here are the steps to get started :

1. Install vim and/or gvim if you don't have them installed already.

2. Install exuberant ctags, I was unable to install ctags version 5.7 on openSUSE 10.2, but ctags-5.6 installed fine. Exuberant ctags can be found at http://ctags.sourceforge.net.

3. Download the taglist plugin zip file for vim. Unzip the file and move the plugin/taglist.vim file to the vim plugin directory (e.g., /usr/share/vim/vim70/plugin). Move the doc/taglist.txt to the vim doc directory (e.g., /usr/share/vim/vim70/plugin).

4. Change to the vim doc directory directory, start Vim and run the ":helptags ." command to process the taglist help file. Without this step, you cannot jump to the taglist help topics.

5. Go to a directory in which you have code stored and create a tag file. This is accomplished by runnings 'ctags [-R] (the -R is an option to recurse into subdirectories). For example, assume I have a collection of python files in some directory and some subdirectories that make up a single project. I would use the following command to create my tag file: ctags -R *.py. If you're using a programming language like C/C++ that uses mutliple file extensions, read about the -h option in the ctags manual.

6. Open vim and type :TlistToggle to open the taglist window. A great shortcut for this is to map a funciton key adding 'nnoremap :TlistToggle to your .vimrc file. This would allow you to simply press F8 in vim to toggle the taglist window opened and closed.

7. Add files to the taglist window. This is done using the :TlistAddFiles or :TlistAddFilesRecursive commands in vim. In my example pyhon project, I would type ':TlistAddFilesRecursive ~/programs/myproject *.py' to populate my taglist window with all of the python files in my project. After your taglist window is populated it should look something like this:

vim taglist screenshot

By default the taglist window opens on the left side. In vim, the taglist window is just a vertical split. You can read more about managing split windows in the vim documentation, but one basic command is to use ctrl+ww to switch between splits. In the taglist window you can then use the enter key to open files in the main window; if you press the enter key while the cursor is on any definition (variable, function etc.) in the taglist window, the appropriate file will be opened in the main window and the cursor will jump to the definition in the file. The + and - keys expand and contract items in the taglist window respectively. For example, in the screenshot above the "function" items are all expanded. However, the "class" and "members" items directly below "image_this.py" are contracted. Other neat features include using the = key to expand all items and the * key to contract all items. In fact, "expanding" and "contracting" text is a standard vim feature known as folding, you can learn more about it in the vim documentation.

8. Obviously, configuring your taglist window every time you open vim would be quite painful. Once you have your taglist window configured for your project, use the ':TlistSessionSave command to save a session, and use the ':TlistSessionLoad command to load a session. Session files are saved in the current working directory.

9. If you haven't done it already, try some of the following tasks in gvim (graphical vim):

- use your mouse to expand the taglist window by clicking and dragging the vertical split line

- switch to the taglist window with a simple left click in the taglist window.

- try double clicking files, functions, classes, etc. in the taglist window to open them in the main window.

- try expanding and contracting items (folds) with left clicks

10. As a bonus, notice a nice little feature that ctags gives us. You can now use ctrl-] or g] when your cursor is on any symbol (variable, function call, etc.) to go to its definition. ctrl-] will do its best to take you where it thinks the definition is, while g] will give you a list of possible declarations. After having used ctrl+] or g] a few times in succession, use ctrl-t to start going back up the tag stack.

11. Use vim or gvim for your next coding project.

Personally, I also added 'let Tlist_Exit_OnlyWindow = 1' to my .vimrc file. This is useful because (as stated above) the taglist window is opened as a vertical split. This means when you close the main window the taglist window will stay open unless you add this option to your .vimrc file. In short, this option closes vim when the taglist window is the only window open.

Please add comments if you have any advice associated with ctags and/or the taglist plugin!

Convert Manual Page to PDF

Interested in converting a man page to a PDF? You can do the following:

$ man -t /complete/path/to/foo_manpage | ps2pdf14 - foo_manpage.pdf

If you want a copy optimized for web viewing:

$ pdfopt foo_manpage.pdf foo_manpage_optimized.pdf

Choosing and Customizing a Window Manager

One of the fantastic things about the X Window System is the empowerment of its users. As users, we are able to choose from a slew of window managers. Gnome and KDE have percolated to the top as the most popular window managers. Personally, I believe that this is likely due to the fact that they are very similar to Microsoft Windows (95 through Vista) and therefore resemble what most people are used to. If you prefer Gnome or KDE that is more than fine with me, but there are alternatives! The most important thing is that your window manager increases your productivity and/or enjoyment. Gnome and KDE are quite similar, however there are some great window managers that often get overlooked, I suggest you try several and decide which one(s) you like!

Here are some window managers to try:

* Xfce is actually a desktop environment that uses Xfvm as a window manager

After installing one of these window managers simply add its executable to a file named .xinitrc in your home directory. If it does not exist, simply create it. For example if I downloaded and installed fluxbox and I wanted it to run instead of Gnome or KDE I would create an .xinitrc file with a single line that read "fluxbox".

With the new trend toward 3d desktops, more and more window managers are supporting 3d operations. If you have a good video card and system resources to spare (waste? ;)), you might want to look into Xgl, Beryl, Compiz, and others.

Personally, my favorite window manager is Fluxbox. It is extremely fast, small, and minimalistic in nature, but it has some wonderful features. Some example features I really love are:

  • Instead of having a "Start" menu, right clicking anywhere on the desktop produces the menu.
  • Alt+LeftClick moves a window, Alt+RightClick resizes a window
  • Scroll mouse anywhere on the desktop swaps workspaces
  • 100% customizable menu
  • Double clicking on menu bar "collapses" the window like a window shade, only leaving the title bar. Clicking on the title bar a second time expands the window.
  • Tabbing, which allows multiple windows to share the same window (hard to explain in one line, but it's really neat!)

----- END OF REQUIRED READING ;) -----

Remember how I was talking about empowerment? Here is one example. Fluxbox is my favorite window manager, yes, but X allows me to spice things up a bit. Before explaining this further, let's review some X concepts (information taken from the Fluxbox FAQ):

You have to understand that a windowmanager is just one more application for X, like netscape or gimp or xterm. Many people new to X come to believe that X runs the window manager and the window manager runs programs. But thats not true. If configured right, you can run all your applications under X, kill the window manager, and start another window manager up. The *real* program that X runs, that runs other programs, is your .xinitrc or .xsession script. When X is started, your .xinitrc or .xsession script is run, and when the script is done, X comes down. Let me repeat that, its important: WHEN .xinitrc IS FINISHED, *THAT* IS WHEN X ENDS. It isn't when your windowmanager exits.

In the age of "Gnome or KDE?" the .xinitrc file has been somewhat forgotten. Here is another pearl of knowledge from the Slackware documentation:

xinit(1) is the program that actually starts X; it is called by startx(1), so you may not have noticed it (and probably don't really need to). Its configuration file, however, determines which programs (including and especially the window manager) are run when X starts up. xinit first checks your home directory for a .xinitrc file. If the file is found, it gets run; otherwise, /var/X11R6/lib/xinit/xinitrc (the systemwide default) is used

With this information we can do some truly wonderful things. For example, I use Fluxbox, but I like having the Gnome "taskbar" (Gnome calls it a panel) so I can use the nifty applets like weather reports, tomboy notes, battery power, volume control, online updates, time and date, and a nice calendar. These Gnome features are simply X applications and X allows me to run these "pieces" of Gnome while using Fluxbox as my window manager. All I had to do was run locate the programs running with Gnome that I wanted to run in Fluxbox. This was accomplished easily by running 'ps ax' while in Gnome. When I had the program names I wanted to run, I simply added them to my ~/.xinitrc file like so:

bean@cobweb:~> cat .xinitrc
fluxbox & wmpid=$! # start fluxbox and store the process id in a variable wmpid
gnome-panel & # run the gnome panel
sleep 10 # give the gnome panel some time to load completely, so applets will dock properly
gnome-power-manager & # run the gnome power manager (great for laptops)
#nm-applet & # run the Network Manager applet (if you're using Network Manager)
opensuse-updater-gnome-applet & # run the online update applet
gnome-volume-manager --sm-disable & # run the volume manager
xset b off # turn off that vile beep
wait $wmpid # wait for fluxbox to return

Notice that I am backgrounding these processes (i.e., I am appending '&'). If this is not done, the .xinitrc script will not continue until the process ends.

Here is a screenshot of my Fluxbox wm with a Gnome panel.

Linux + Wireless

I just installed the newly released openSUSE 10.3 on a Dell Latitude D800 laptop. One of the major complaints about Linux is lack of support for wireless networking. openSUSE does a pretty good job of making things relatively painless, but your wireless card may not work out of the box. From my experience the Intel PRO/Wireless cards work really well.

When I checked my hardware information in SUSE and saw 'Dell Truemobile 1450 MiniPCI' as my wireless card I wasn't excited. YaST did list my wireless card under Network Devices -> Network Card and this gave me a ray of hope. However, running 'ifconfig' only showed my eth0 wired network card. 'iwconfig' did show my wireless card as eth1, however 'iwlist eth1 scan' reported that the device did not exist.

The Dell Truemobile 1450 MiniPCI uses the Broadcom bcm43xx chipset . This information can be found by running 'hwinfo --wlan'.

cobweb:/home/bean # hwinfo --wlan
18: PCI 203.0: 0282 WLAN controller
Model: "Dell Truemobile 1450 MiniPCI"
Vendor: pci 0x14e4 "Broadcom"
Device: pci 0x4324 "BCM4309 802.11a/b/g"
SubVendor: pci 0x1028 "Dell"
SubDevice: pci 0x0003 "Truemobile 1450 MiniPCI"

There is a 'bcm43xx' kernel model, which was loaded (you can check loaded kernel modules using the 'lsmod' command), but it apparently wasn't working correctly.

Apparently Broadcom never released details about these chips. So the driver included in the Linux kernel is based upon reverse engineered specifications. This might explain why it wasn't working for me.

I did find a couple of possible solutions in the NDISwrapper and bcm43xx-fwcutter. ndiswrapper is the solution that I used; it was only slightly painful and seems to be working great now. Madwifi is a solution for wireless cards with Atheros (not Broadcom) chipsets.

NDISwrapper

ndiswrapper implements Windows kernel API and NDIS (Network Driver Interface Specification) API within Linux kernel. A Windows driver for wireless network card is then linked to this implementation so that the driver runs natively, as though it is in Windows, without binary emulation. In short, ndiswrapper allows you to use Windows drivers for WLAN cards in Linux.

With ndiswrapper, most miniPCI (builtin), PCI, PCMCIA (Cardbus only) or USB wireless network cards work in Linux with x86 or x86-64. Although ndiswrapper is intended for wireless network cards, other devices are known to work: e.g., ethernet cards, USB to serial port device, home phone network device etc.

ndiswrapper packages come with openSUSE, but they are not installed. Simply install the ndiswrapper package and the ndiswrapper-kmd- package (you can get your kernel flavor by running 'uname -r' as root).

Once I had the ndiswrapper installed I followed these steps

  1. Grab the windows drivers for the Dell TrueMobile 1450 miniPCI card from Dell's support page.
  2. new directory, move the downloaded .exe inside, and unzip the .exe: mkdir ~/tmp; mv R90501.EXE ~/tmp; cd ~/tmp; unzip R90501.EXE
  3. Tell ndiswrapper where the inf is: 'ndiswrapper -i ~/tmp/bcmwl5a.inf'. This will create a directory in /etc/ndiswrapper named bcmw15a. ndiswrapper will automatically try to load all drivers in this directory when the ndiswrapper kernel module is started. Also note that ndiswrapper looks for other files (such as .sys files) in addition to the .inf files, so it's a good idea to just put all the windows drivers files in the same directory.
  4. Disable the bcm43xx kernel module and related kernel modules. First, see what's loaded: 'lsmod | grep bcm'. Then, disable what's loaded: 'rmmod >module name>'. The modules to unload will probably be bcm43xx, ieee80211softmac, ieee80211, and firmware_class.
  5. Load the ndiswrapper kernel module: 'modprobe ndiswrapper'

If you have installed the correct driver you should see something like this:

bcmwl5: driver installed
device (14E4:4320) present

and you should now be able to use your wireless card.

‘present’ means that you have a card that can be used with the driver installed. In this case, broadcom driver bcmwl5 is used. If you see ‘cannot locate lspci. Unable to see if hardware is present’, you need to install the pciutils package.

If you get something like

bcmwl5: driver installed
device (14E4:4320) present (alternate driver: bcm43xx)

then you / kernel may use bcm43xx module for that device. If that module is loaded, then ndiswrapper wouldn’t be able to use that device; see Troubleshooting. . This usually occurs if the kernel is trying to use an alternative driver (this is why we rmmod the other kernel modules).

You should now be able to use your wireless lan card normally.

To make this change permanent you will want to do a couple of other things:

First, you will want to blacklist the kernel modules you don't want to load anymore. This can be done by adding lines similar to those below to your /etc/modules.d/blacklist file:

# wireless card
blacklist bcm43xx
blacklist ieee80211softmac
blacklist ieee80211
blacklist firmware_class

You might not want to copy and paste this verbatim. The blacklisted modules should be the modules you unload in the steps above (using rmmod).

Second, you will want to make sure the ndiswrapper module is loaded when you boot. To do this, add "ndiswrapper" to the MODULES_LOADED_ON_BOOT variable in /etc/sysconfig/kernel or add "modprobe ndiswrapper" to to /etc/init.d/boot.local or a script that runs at boot time.

Here is a list of cards known to work with ndiswrapper.

bcm43xx-fwcutter

As the name suggests this solution is only for Broadcom 43xx chips.

http://forums.gentoo.org/viewtopic-t-409194-postdays-0-postorder-asc-start-0.html

These are Gentoo specific instructions, but they should be easy to translate to SUSE. You won't need to work about the kernel compilation as the BCM43XX support is enabled by default in openSUSE, and Instead of emerging bcm43xx-fwcutter you can get it at http://developer.berlios.de/project/showfiles.php?group_id=4547.

Madwifi

The Madwifi team develops Linux kernel drivers for Wireless LAN devices with Atheros chipsets.

Here is a list of cards known to work with ndiswrapper.

Madwifi has good doucumentation that can be found here http://madwifi.org/wiki/UserDocs/FirstTimeHowTo. openSUSE comes with the Madwifi package available, so you don't need to compile it; just install the rpm.

New Team at Novell

Yesterday was my last day on the ZENworks team at Novell. I moved down a couple of floors to the Linux Desktop team. I will be working on building and testing better accessibility support for the Linux Desktop. I'm excited about getting more involved with the Linux community and learning more about accessibility issues.

I do have a private company blog with some (interesting?) information, I plan to bring over some posts to give this page a running start.